Now you are ready to create and promote your video. Putting It All Together to Create the Sizzle Reel
Once you have all of the elements for your sizzle reel in a file format, you are ready to create the sizzle reel. These four elements, as previously noted, include the following:
– the narration as a mp3 or wav file
– a music file (highly recommended) as mp3 or wav file
– the photos or images in a jpg., jpeg., .png, or other accepted format
– the video clips if any in an mp4 or other accepted video format.
Now the process is relatively simple. Use a video editor, such as Camtasia, Final Cut Pro, or others which you can find through Google Search — just put in “editing software” or “video editing software.” Then, put the four elements, sometimes referred to as “media,” on different tracks in the video editor.
Use one track for the music file, another track for the narration, and a third track for the photos, video clips, and credit and contact information.
The way you import these files can vary depending on which video editing platform you use. Commonly these are called media files. However you import the files, you can save the video under any name you want.
Then, keep saving it as you go along, so you can always open up that project file should you close it or should the program suddenly close itself, such as due to a power outage. Then, you don’t need to start your sizzle reel again from scratch to work on it some more to make any changes.
Once the needed files are imported into the video editor, the next step is to place a copy of each file in one of the tracks. I prefer to put the music file in the first track (Track 1), since it will be the background. Then, I like putting the narration file in the second track (Track 2), since that will generally be unchanged, unless make any edits, such as cutting down or lengthening the timing of one or more pauses.
If so, you can easily cut out the extra second or part of a second between each line of narration and push them together. Or you cut on the pause and push each segment of narration further apart. But normally, if the narrator or text to voice technology has correctly recorded the narration, that’s the final audio recording.
Now you can adjust the levels of the music file and narration. Generally, reduce the music file level to 25-35% for the background to the narration. Commonly, the narration is fine as is, though if it seems low, raise the level.
Next, add in the photos and video clips on the third track (Track 3). If you have numbered these files to match the script, they will already be in order. If your first image isn’t a full video screen size, put in any full-sized image to set the screen size. It can be one of the images for this video, or you can upload and use any other full-sized image.
The reason to begin your video with a full size image is because the first image sets the screen size, and you can later adjust the sizes of any images or videos to fit the full screen. Just move the editing bar over this image to set the size, and after this, you don’t need to use this image any more, and you can delete it I it isn’t part of the sizzle reel.
Finally, add in the photos and video clips in the correct order and place them on them on the track. Ideally, add 4 to 5 photos or video clips at a time, so you don’t have to keep moving the rest of the photo and video files around as you match up the photos and video clips with the narration. Listen to the narration to determine what goes where. You can stretch out or shorten the photos or graphic images to fit the narration.
If a video clip is too long, you can shorten it at either end, but you can’t stretch it out. After you adjust the first set of photos and video clips, add another 4 to 5 files to the track and adjust them until they are matching the narration. Lastly, add the credit, website, and contact files, and set them up so they last about 9 to 12 seconds.
If the music is too short, you can copy the file to lengthen it. If the music is too long, you can cut it or shorten it. If you want to make the music louder under the credit, website, and contact information, make another copy of the music, adjust the length to correspond to the length of the credit, website, and contact slides. Then, use the original level or increase the level of the music track.
To illustrate, here are examples from videos I created in Camtasia.
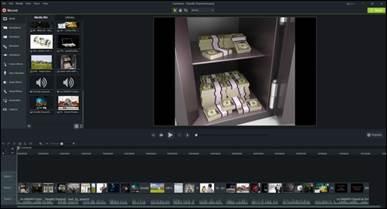
The following shows a video set up for a sizzle reel for Deadly Deposit, a book and film about a bank deposit made in the wrong account that turns deadly. As you can see, the top left panel features the different photo image or video clips for the film, and the second screen shot, shows the end of the photo files, plus the audio files for the narration and music.
The section over the tracks, shows the files for the narration and photo images placed on the tracks. The images are matched to the different segments of the narration, shown by the spaces which are pauses between each segment. In this case, there was no music track, since it was one of the first sizzle reels I created, though later sizzle reels all have one.
You’ll also notice the numbering on all of the images for ease of placement. The bar that moves when the video plays or can be moved to any place on the track is in the beginning of the video. The bar with the minus (-) an plus (+) sign is used to increase or decrease the size of the tracks, so that the images and audio tracks become longer when the track is stretched out; they become smaller when the track is shorter.
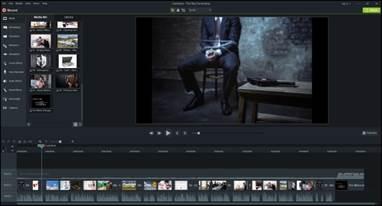
Here’s another example — a video for a client about a business deal that led to a kidnapping. It includes a music track, which is on Track 3, rather than Track 1, because it was added after the other tracks. Though I find it easier to work with the images on Track 1, it’s fine to organize the tracks differently.
Here the music and narration files have been added first to the media list, though it doesn’t matter where they are placed on the list. As before, all the images are numbered, so they can be easily matched to the narration. In this case, the bar is on the third image, which is shown on the large screen.
There is also an extra image of a prisoner in jail that is not in the sizzle reel, but it has been used as a size marker, to set up a full screen for the video. Once that full screen has been set up, the image of the prisoner in jail can be removed from the track, though it can remain in the media list without being used.
This setup also shows that the music level has been increased at the end of the video, when it accompanies the final credits and contact slides that have no narration.
Once all of the images, narration, and music tracks are set up, you can play through the video and make any final adjustments, such as the level of the music or a more exact placement and timing of any images.
Exporting Your Final Video
Then, once the video is finalized you can export or render it, depending on the term used by the video editing platform. There are a number of setting for the size of the screen, though the most common ones are 720 pixels for a larger video and a 480 for a smaller one. These numbers refer to the number of pixels across the screen. The 720 video is a good size because this is the highest level allowed for posting on Facebook and some other platforms, though the highest size is 1080 pixels for a high definition video. The result will be an MP4 file.
If you are only using JPG images, the file size of the exported MP4 file will be relatively small, perhaps 3000-7000MB. But once you include video clips, the size will be much larger — say 25,000-70,000MB, depending on how many clips you use and how long they play, since each video is made up of multiple video images — commonly 24 or 30 separate photo images or frames per second. When you look at the video, you see a moving image, but when you slow it down in the editing process, you can see each frame separately.
One you export your video, your sizzle reel is complete, and you are ready to use it to promote your book or film to film producers and agents and to anyone else.
Using Your Sizzle Reel to Promote Your Book or Film
Once you have your sizzle reel, you can use it in various ways to promote your book and film. To start promoting the reel, first upload it onto your YouTube channel — or create one to do so. You can also upload the sizzle reel onto your website or a landing page for your book and film. After you post your reel on any of these sites, you can link to it in various ways.
Some of the places to place the link to your sizzle reel include the following:
– In a query letter sent to producers and agents,
– In a logline and synopsis for a stand-alone film,
– In a Show Bible if your script is part of a film/TV series,
– In a posting on the social media,
– In a press release about your book or film,
– In an announcement to friends, family members, & business associates
– In an in-person or online presentation to a group,
– And more.
In short, the sizzle reel can be used to give anything you do to publicize your book or film even more impact. It does so, because it shows off your book and film in a dramatic, visual way, and hat is likely to create more interest in learning more.